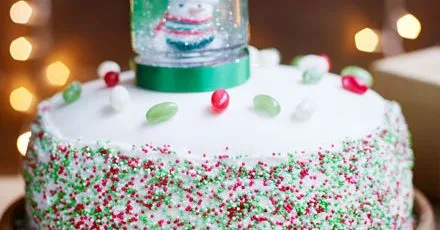
Sparkling snowfetti cake
Bring a little magic to your Christmas cake with a simple snow globe and colourful sprinkles - kids will love helping to decorate!
Ingredients
15 serv.- unsalted butter↗225g 225g
softened, plus extra for greasing
- light muscovado sugar↗225g 225g
- large eggs↗4 4
beaten
- plain flour↗225g 225g
- ground mixed spice2 tsp 2 tsp
- small orange↗zest 1 zest 1
- pecans↗85g 85g
or walnuts, toasted, then roughly chopped
- cloudy apple juice↗150ml 150ml
- unsalted butter↗50g 50g
- maple syrup↗2 tbsp 2 tbsp
- dark rum↗5 tbsp 5 tbsp
- mixed dried fruit800g 800g
(the kind that includes mixed peel)
- dried cranberries↗175g 175g
- dark rum↗2 tbsp 2 tbsp
- maple syrup↗1 tbsp 1 tbsp
- apricot jam↗4 tbsp
warmed and sieved
- icing sugar↗
sifted, for rolling out
- natural marzipan750g
- cooled boiled water
or colourless alcohol
- white sugarpaste↗750g
(fondant) icing
- large egg white1
- icing sugar↗225g
sifted
- red, white and green sugar sprinkles
(sometimes labelled ‘nonpareils’)
- red, white and green jelly beanssmall handful
- medium jar1
label removed
- plastic cake topper1
(we used a snowman figurine) to fit inside the jar
- green or red plastic milk bottle top
if needed
- strong glue
(not water-based)
- acrylic paintgreen
and small paintbrush
- glycerine2 tbsp
- silver craft glitter1 tsp
- ribbonfestive
to tie around the jar lid
Step-by-step instructions
- 1
Start with the fruit. Pour the apple juice into a saucepan and bring to a simmer. Add the butter, let it melt, then take off the heat and add the syrup and rum. Put the mixed fruit and cranberries into a large bowl, pour over the hot rum mix, then cover tightly with cling film and leave overnight.
- 2
The next day, heat oven to 160C/140C fan/gas 3. Grease and double-line a 20cm round, deep cake tin with non-stick baking parchment. Beat the butter and sugar together until creamy and pale, then gradually beat in the eggs until light and fluffy. If the mix starts to split or look lumpy, add 1 tbsp of the flour and keep beating. Sift in the flour, spices and 1/4 tsp salt, and fold in using a large spoon. Fold in the orange zest, nuts, soaked fruit and soaking liquid.
- 3
Spoon the batter into the tin, level the top, then make a slight dimple in the middle using the back of the spoon. Bake for 1 hr 30 mins, then reduce oven to 140C/120C fan/gas 1 and bake for a further 1 hr 45 mins or until it has risen, is a dark golden colour and a skewer inserted into the middle of the cake comes out clean. Put the tin on a cooling rack and leave until warm.
- 4
To feed the cake the first time, use a cocktail stick to poke all over the top of the warm cake. Stir together the rum and maple syrup, then slowly spoon over the cake. Cool completely, then remove the baking parchment, wrap loosely in clean baking parchment and store in an airtight tin. Feed the cake every week to 10 days until you decorate it.
- 5
Now you're ready to cover and ice your cake. Sit the cake on a large flat plate or board and brush a thin layer of apricot jam over the top and sides.
- 6
Dust the work surface with icing sugar. Lightly knead the marzipan until pliable, then roll out in one direction, turning the marzipan 90 degrees every few rolls and keeping the pressure even. Keep it in a circular shape, reshaping it if needed as you go. When large enough (about 35cm across for a 20cm cake), lift over the cake. Smooth the top and sides with your palms and trim with a knife. If you have time, leave to dry overnight.
- 7
Clean the work surface and rolling pin. Using a pastry brush, lightly brush the sides with cooled boiled water or alcohol, then cover with the sugarpaste icing, rolling it in the same way. Lift onto the cake, then work your way gradually around, smoothing out any folds with your palms to avoid wrinkles forming. Polish the icing with the palms of your hands (or a proper cake smoother) for a smooth finish. Trim with a sharp knife.
- 8
Now you're ready to decorate. Make the icing by mixing the egg white and sugar together until thick and smooth. Using a palette knife, spread a thin layer of icing all around the sides of the iced cake. Sit the cake on a large tray and, holding it at an angle, scatter on the sprinkles. You can use a palette knife to help, scooping them up and pressing them on. Leave to dry, then set aside.
- 9
Sit the cake topper on the jar’s lid, then invert the jar over it. If the figurine looks a little lost in the jar once closed, then glue in the milk bottle top as a booster. When you’re happy, glue the cake topper in place and leave to dry.
- 10
Use the acrylic paint to paint some simple fir trees on the back of the jar (remember to have it upside down as you paint) and leave to dry.
- 11
When ready, fill the jar three-quarters full with water, add the glycerine and dissolve. Spoon in the glitter, then screw on the lid and shake well. The glitter will clump a bit at first but then separate. Carefully top up with water if needed, then screw tightly and dry any drips, taking care not to damage your painted trees. Glue the ribbon onto the lid/base of your snow globe.
- 12
Use a little of the leftover icing to attach the jelly beans to the top of the cake, leaving room for the snow globe. Sit the snow globe on top (you can press it into the icing a little if it seems wobbly) and shake whenever you feel like it!

The Prepka App Is Ready
All your recipes at your fingertips — in the Progressive Web App