Excavator Cake
Per serving
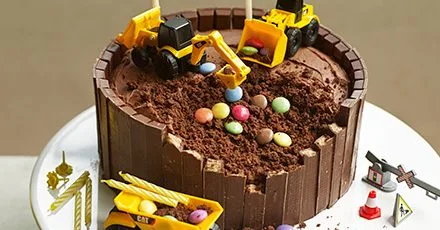
You don't need to be an engineer to make this impressive construction site cake, just a few toys, chocolate wafer bars and a bit of creative imagination.
Ingredients
20 serv.- unsalted butter250g g
- whole milk↗50ml ml
- whole natural yogurt↗150g g
- vanilla paste↗½ tsp tsp
or extract
- large eggs↗3
- light muscovado sugar↗250g g
any lumps crushed
- self‑rising flour↗250g g
- baking powder↗2 tsp tsp
- cocoa powder↗50g g
- cocoa powder↗2 tbsp tbsp
- milk↗2 tbsp tbsp
plus another 1 tsp if needed
- unsalted butter↗200g g
very well softened
- icing sugar↗300g g
- vanilla paste↗1 tsp tsp
or extract
- large round cake base
or large flat plate, about 13 inches/33 cm
- пластикові екскаватори2
і один самоскид, або подібне
- шоколадні вафельні батончики9 x four-finger
- багатокольорові цукрові покриті шоколадні кнопки↗handful of
або інші кольорові цукерки
- маркер
- картон10 x 5cm rectangle of yellow
жовтий прямокутник 10 × 5 см
- соломка для пиття1
- клейка стрічка
Step-by-step instructions
- 1
Preheat the oven to 180 °C (convection 160 °C, gas 4). Use a little butter to grease the sides and bottom of two 20 cm diameter tins. Melt the remaining butter in a small saucepan. Remove from heat and add the milk, yogurt and vanilla paste, then the eggs. Beat well with a fork.
- 2
In a large bowl combine the dry ingredients and ¼ teaspoon of salt. Whisk to mix – this aerates and saves sifting. Add the wet ingredients and whisk until you have a smooth, silky batter.
- 3
Don't delay. Evenly pour the batter into the prepared tins and place them on the middle rack of the oven. Bake for 25 minutes or until the batter has risen and a skewer inserted in the centre comes out clean. Cool for 10 minutes in the tins, then carefully turn the cakes out and let them cool upside‑down on a wire rack.
- 4
Prepare the buttercream. Mix the cocoa with 2 tablespoons of milk until smooth. In a large bowl place the butter and sift the powdered sugar over it. Add the cocoa mixture, vanilla paste and a pinch of salt. Beat with an electric mixer for a few minutes until creamy and spreadable. If needed, add another teaspoon of milk.
- 5
Place one of the cakes towards the back of the base or plate and secure it with a little cream so it doesn’t slip. Spread about a quarter of the cream over its surface.
- 6
Place the second cake on top. Using a small serrated knife cut a crater shaped like a shell into the top of the cake. Cut down to about the middle of the sponge, removing roughly a quarter of the top. Keep the removed piece. Position the two excavator toys on the cake top to check the size and shape of the crater, then set them aside again.
- 7
Using a palette knife, spread the remaining cream evenly over the top and sides of the cake. Ensure the edge of the cut-out area is clearly defined.
- 8
Break off enough ends of the four‑pronged chocolate bars to match the edge of the cut-out area and press them into the cream. Then attach the remaining “fingers” around the sides of the cake.
- 9
Crush the cake piece you removed in step 6 to make “soil”. Partially fill the cut-out area with this soil, adding a few sugar‑coated chocolate buttons of various colours if desired. Place the excavators on top and fill their buckets with soil and coloured chocolate buttons.
- 10
Fill the dump truck or cargo vehicle with even more crumbs and coloured chocolate buttons, allowing some of the soil to spill over the edge of the cake and broken chocolate bars.
- 11
Use a marker to write a message on a card and draw diagonal black lines. Cut the straight end of a straw in half, then attach them to the back of the card with tape to create a sign. Place the sign on the back of the cake. If the sponge cakes are used fresh or within a day after baking (wrap well after cooling). Store in a cool place (not the fridge) for up to two days.

The Prepka App Is Ready
All your recipes at your fingertips — in the Progressive Web App