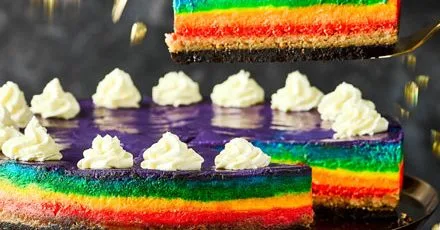
Rainbow cheesecake
Per serving
Our showstopping, colourfully layered cheesecake is sure to brighten up any party, especially if you’re celebrating Pride month. It’s easy to make as well.
Ingredients
12 serv.- butter↗170g g
plus extra for the tin
- Oreo biscuits140g g
(or similar) cream removed
- digestive biscuits140g g
crushed to fine crumbs
- full-fat soft cheese↗600g g
- golden caster sugar↗170g g
- plain flour↗2 tbsp tbsp
- vanilla extract↗1½ tsp tsp
- large eggs↗2
- soured cream↗200g g
- gel food colourings↗
(red, orange, yellow, green, blue and purple)
- double cream↗
whipped to decorate (optional)
Step-by-step instructions
- 1
Heat the oven to 180C/160C fan/gas 4. Line the base of a 20cm springform tin with a square piece of baking parchment or foil, then clip the side on, so the paper or foil is secure and the excess sticks out.
- 2
For the base, melt 85g of the butter in a medium pan. Stir in the dark biscuit crumbs so the mixture is evenly damp and firmly press into the bottom of the tin. Melt the remaining butter and stir in the digestive crumbs. Firmly press on top of the first layer, then bake for 10 mins. Leave to cool.
- 3
Meanwhile, increase the oven temperature to fan 220C/200C fan/gas 7. For the filling, whisk the soft cheese with the sugar, flour, vanilla extract and a pinch of salt. Whisk in the eggs and soured cream but don’t over‑beat. The batter should be smooth and very thick. Divide the filling equally between six bowls and colour each one (purple, blue, green, yellow, orange and red).
- 4
Butter the sides of the tin and put on a baking sheet. Spoon in the red filling and carefully spread it out in an even layer, then repeat with the orange, yellow, green, blue and finally, purple. Bake for 10 minutes.
- 5
Reduce the oven temperature to 110C/90C fan/gas 1/4 and bake for 35-40 mins more. If you gently shake the tin, the filling should have a very slight wobble in the centre; if it looks liquid, cook for another 5 mins. Turn off the oven and cool with the door slightly ajar. Chill the cooled cheesecake until you want to serve it. Will keep in the fridge for up to three days. Decorate just before serving.
- 6
Whip the cream until thick and just holding its shape. Use a piping bag fitted with a star nozzle to pipe blobs or rosettes on top of the cheesecake around the edge. You can also make rainbow rosettes, with the gel colourings by first using a paint brush to paint stripes down the inside of the piping bag.

The Prepka App Is Ready
All your recipes at your fingertips — in the Progressive Web App