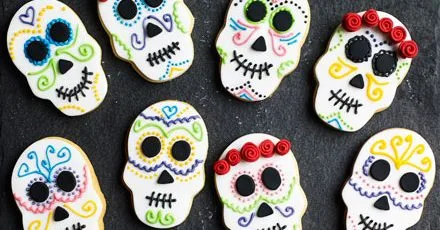
Day of the Dead Cookies
Celebrate the Mexican Day of the Dead festival with these sugar skull cookies – unleash creativity with bright icing and floral decorations.
Ingredients
8 serv.- cold slightly salted butter↗175g g
cut into cubes
- plain flour↗250g g
plus extra for dusting
- icing sugar↗100g g
- large egg yolk↗1
- sugar for royal icing500g g
plus a little for dusting
- packet of ready-to-roll white sugar paste or fondant500g g
- food colourings↗
pastes of various colors, you will need red for roses and black for eyes and mouth
- skull-shaped cutter
(ours was 12cm x 8cm)
- small round cutter
(about 1.5cm) or use the tip of a piping bag
Step-by-step instructions
- 1
To make the dough, place the butter, flour and a pinch of salt in a food processor. Mix until the mixture resembles crumbs and the butter is well incorporated. Add the icing sugar, egg yolk and 2 tsp cold water. Mix again until the mixture starts to form clumps, add another 1 tsp water if the dough looks too dry, but try not to add more as it will make the cookies tough. Dump the crumbs onto a work surface and press everything together, forming a dough ball; you may need to knead several times for a uniform texture. Wrap in cling film, shape into a flat disc and chill for 30 minutes.
- 2
Preheat the oven to 180 °C/160 °C fan/gas 4 and line two large baking trays with parchment paper. If the dough is very stiff, let it sit at room temperature for 10 minutes, or until it softens slightly. Dust the work surface with flour, then roll the dough out to the thickness of a £1 coin. Cut out as many skull-shaped cookies as possible, then gather the leftover dough, roll again and cut out a few more. Arrange the skull shapes on the trays, bake for 18–20 minutes until lightly golden, rotate the trays halfway through baking if the oven heats unevenly. Let cool on the trays for 10 minutes, then transfer to racks to cool completely.
- 3
While the cookies cool, prepare the icing. In a large bowl combine the sugar for royal icing with enough water to make a thick glaze. Divide the glaze among as many bowls as you have colours (you need one black for the mouth). Then, using food colourings, give each a bright shade – a drop of colour paste is enough, so start with a small amount and add more as needed. If the glaze is too thick for a piping bag, add another drop of water. Transfer each colour into a separate disposable piping bag and seal the ends (the pins hold them closed well).
- 4
Break off 50 g of sugar paste and set the rest aside, wrapped in film (to prevent it from drying and cracking). Use red food colouring to tint a small lump of sugar paste red, mixing until evenly coloured. To make roses, take nut‑shaped balls of red sugar paste and press them into long thin oval shapes on the work surface (about 1 cm × 4 cm; if overly sticky, use a little icing sugar). Twist the paste from one end, forming a rose. While it still lies on its side, cut off the bottom to create a flat base. Continue with the remaining red paste until you have about 20 roses (enough for 4 cookies).
- 5
Clean the surface and dust with a little extra icing sugar. Roll out the remaining sugar paste to the thickness of a 50p coin, then cut as many skull shapes as you have cookies. Use a little of one of the coloured icings to attach the sugar skulls to the cookies.
- 6
Gather the remaining sugar paste into one piece and colour it with black food colouring, mixing until uniform. Roll out the black sugar paste and cut circles for the eyes (use a round cutter or the tip of a piping bag). Attach the eyes and roses to the cookies with a little coloured royal icing. Trim the corner of all bags, creating a small open window, and decorate the cookies as desired – flowers, hearts and polka‑dot patterns look wonderful. Let the cookies dry for 1 hour before serving. Decorated cookies will keep for 3 days in an airtight container.

The Prepka App Is Ready
All your recipes at your fingertips — in the Progressive Web App